Master Landscape Photography: Essential Tips
- Mountain Lens Studio

- Aug 7
- 4 min read
If you’ve ever stood in front of a breathtaking mountain vista or a serene lakeside at dawn and wished you could capture that moment perfectly, you’re not alone. Landscape photography is a magical way to bottle up nature’s beauty and bring it into your living space. Over the years, I’ve learned that mastering landscape photography settings is key to turning those fleeting moments into stunning images. So, let’s dive into some practical tips and tricks that will help you elevate your shots, whether you’re a homeowner looking to decorate or just someone who loves nature’s artistry.
Getting to Know Your Landscape Photography Settings
Before you even step outside, it’s crucial to understand the basics of your camera settings. Landscape photography is all about capturing detail, depth, and the mood of a scene. Here’s what I focus on:
Aperture: I usually set my aperture between f/8 and f/16. This range gives me a deep depth of field, meaning everything from the foreground to the background stays sharp. It’s perfect for those sweeping mountain views or intricate forest scenes.
Shutter Speed: This depends on the light and what effect I want. For still landscapes, a slower shutter speed works well, especially if I’m using a tripod. But if there’s movement, like flowing water or swaying trees, I might experiment with longer exposures to create a dreamy blur.
ISO: I keep this as low as possible, usually around 100 or 200, to avoid grainy images. Clean, crisp photos are what I’m after.
Focus Mode: Manual focus is my go-to for landscapes. It gives me control, especially when I want to focus on a specific element in the scene.
One trick I’ve picked up is to shoot in RAW format. It might sound technical, but it’s a game-changer. RAW files hold more data, so you can tweak exposure, contrast, and colors later without losing quality.

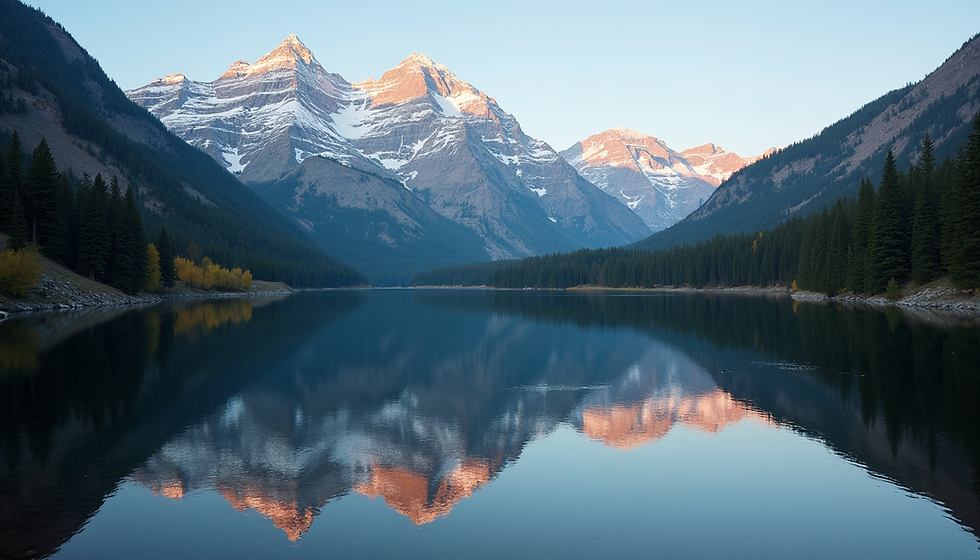
Capturing the vastness of a mountain range requires sharp focus and balanced settings.
How to Nail Your Landscape Photography Settings in Different Conditions
Lighting can be tricky. Early mornings and late afternoons are my favorite times because the light is soft and golden. But what about midday or cloudy days? Here’s how I adjust:
Golden Hour: Lower your ISO, use a smaller aperture (higher f-number), and slow down your shutter speed. This combination captures the warm glow and long shadows beautifully.
Midday Sun: The light is harsh, so I open up the aperture a bit (lower f-number) to let in more light and increase shutter speed to avoid overexposure. Sometimes, I use a polarizing filter to reduce glare and boost colors.
Cloudy or Overcast: These days are perfect for moody shots. I bump up the ISO slightly and use a wider aperture to keep the scene bright but soft.
Don’t forget your tripod! It’s a lifesaver for steady shots, especially when you’re playing with slower shutter speeds.

Using a tripod helps maintain sharpness during long exposures.
If you want to dive deeper into landscape photography tips, there’s a treasure trove of advice waiting for you at Mountain Lens Studio’s blog.
What are the 4 Pillars of Landscape Photography?
Understanding the core principles can really boost your confidence behind the lens. Here are the four pillars I always keep in mind:
Composition: This is where your creativity shines. Use the rule of thirds, leading lines, and natural frames to guide the viewer’s eye through the photo. For example, a winding river or a path can lead the eye into the distance.
Light: Light sets the mood. Golden hour light is warm and inviting, while blue hour light (just before sunrise or after sunset) gives a cool, tranquil feel.
Focus and Depth of Field: Sharpness is crucial. Use a small aperture for maximum depth of field, but don’t be afraid to blur the background if you want to highlight a particular subject.
Timing and Patience: Sometimes, the perfect shot means waiting for the right moment - a cloud to part, a bird to fly by, or the sun to peek through.
I remember one chilly morning when I waited nearly an hour for the fog to lift just enough to reveal a hidden mountain peak. That patience paid off with one of my favorite shots.

Patience and timing reveal hidden beauty in landscape photography.
Essential Gear Beyond Your Camera Settings
While settings are vital, the right gear can make a huge difference. Here’s what I always carry:
Tripod: As mentioned, it’s essential for stability.
Filters: Polarizers reduce glare and enhance colors, while neutral density (ND) filters allow for longer exposures even in bright light.
Remote Shutter Release: This helps avoid camera shake when pressing the shutter button.
Extra Batteries and Memory Cards: You don’t want to run out of power or space when the perfect moment arrives.
Also, dress for the weather and bring a backpack that’s comfortable to carry. You’ll often find the best spots require a bit of hiking.
Bringing Your Landscape Photos Into Your Home
Once you’ve captured those stunning images, why not bring that beauty indoors? Large prints of mountain scenes or serene lakes can transform a room, adding a sense of calm and connection to nature. I’ve found that framing your photos with simple, natural materials like wood complements the outdoor vibe perfectly.
If you’re looking for inspiration or ready-made gallery-quality prints, Mountain Lens Studio offers a fantastic collection that can help you bring the mountains into your living space effortlessly.
Landscape photography is a rewarding journey. With the right settings, a bit of patience, and a love for the outdoors, you can create images that not only capture nature’s beauty but also bring a piece of it into your everyday life. So grab your camera, head outside, and start exploring - the mountains are waiting!

Comments